
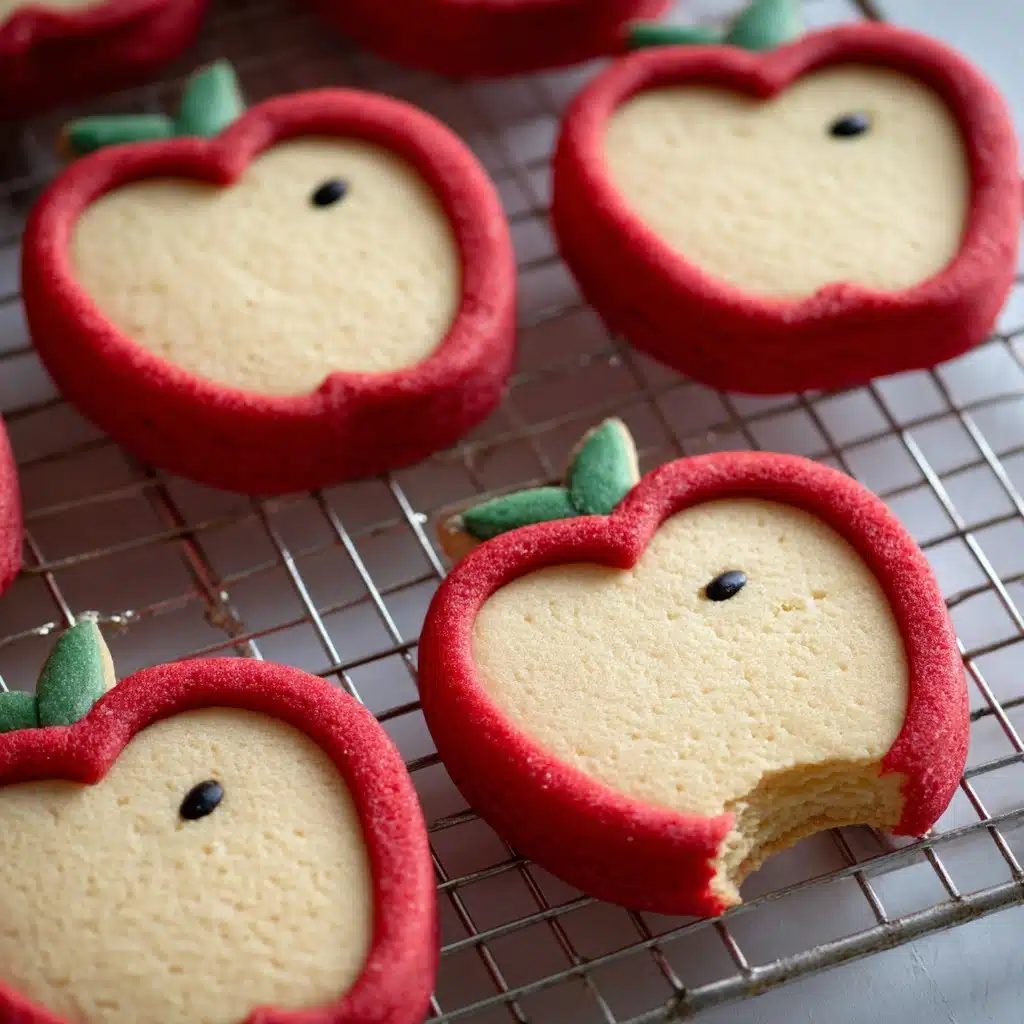
Apple Slice u0026amp; Bake Cookies Recipe
If you love a cookie that’s as delightful to look at as it is to eat, then you are going to fall head over heels for these Apple Slice u0026amp; Bake Cookies. They’re not just any cookies; they’re a charming little treat that captures the sweet essence of apples with a gorgeous touch of color and texture. Each bite yields a soft, buttery cookie with just the right sprinkle of black sesame seeds adding a subtle crunch and a hint of earthiness. Baking these uniquely shaped and vividly colored cookies is such a fun and rewarding experience—you get to create edible art that tastes fantastic, perfect for sharing around the holidays or just brightening up an ordinary afternoon.

Ingredients You’ll Need
The magic behind Apple Slice u0026amp; Bake Cookies is in the simplicity and quality of each ingredient. Every element plays a pivotal role in creating the cookie’s tender crumb, delightful color, and that satisfying flavor that dances on your tongue.
- 2 1/2 cups all-purpose flour: The backbone of the cookie dough, providing structure and a tender bite.
- 1 tsp. baking powder: Helps the cookies rise, giving them a soft and airy texture.
- 1/4 tsp. salt: Enhances the sweetness and balances the flavors.
- 1 cup unsalted butter, softened: Creates richness and the perfect buttery taste; make sure it’s softened for easy mixing.
- 1 1/2 cups granulated sugar: Sweetens the dough and aids in browning.
- 1 egg: Binds all the ingredients together and adds moisture.
- 2 tsp. vanilla extract: Injects warm, aromatic notes that elevate every bite.
- 2 drops red food dye: Gives that vibrant apple red color that makes the cookies pop.
- 1 drop green food dye: Adds a subtle leafy green shade to mimic apple stems.
- 1 drop brown food dye: Perfect for creating the tiny apple stem with natural tones.
- 1/2 Tbsp. black sesame seeds: Adds crunch and a touch of savory contrast to the sweetness.
How to Make Apple Slice u0026amp; Bake Cookies
Step 1: Mix Dry Ingredients
Start by whisking the flour, baking powder, and salt together in a medium-sized bowl. This ensures even distribution, which is key to getting an even rise and consistent texture throughout your cookies. Set this bowl aside—you’ll bring it back in soon.
Step 2: Cream Butter and Sugar
In a separate bowl or the bowl of your stand mixer fitted with a paddle attachment, mix the softened butter and granulated sugar on low speed. Whip them until the mixture is light and fluffy, roughly two minutes. This process aerates the batter, resulting in cookies with a tender crumb.
Step 3: Add Egg and Vanilla
Next, add the egg and vanilla extract to your creamed butter and sugar. Continue mixing until it’s fully combined and silky smooth. Make sure to scrape down the sides of your bowl periodically; you want everything uniformly blended.
Step 4: Combine Wet and Dry Ingredients
Slowly add your dry flour mixture to the wet ingredients. Mix gently until a soft dough forms. Overmixing here can make the cookies tough, so just stir until everything comes together.
Step 5: Divide and Color the Dough
Now the fun part—coloring! Take about 1/2 cup of dough and set it aside for the red color. Then remove 1 tablespoon for green dye and 1 tablespoon for brown dye. Keep the remaining dough uncolored. Using gloves if you have them, knead in food coloring drop by drop until each dough portion achieves a rich, even color that resembles an apple’s natural hues.
Step 6: Roll and Chill the Dough
Roll the red dough out very thin, about 1/8 inch thick, ideally between sheets of parchment paper to avoid sticking. Then roll the green and brown doughs into long, thin logs to shape the apple’s stem and leaf later. Finally, roll the uncolored dough into a log approximately 1 1/2 inches in diameter. Pop all your dough pieces into the fridge for at least 2 hours to chill thoroughly.
Step 7: Assemble the Apple Shape
After chilling, remove the uncolored dough log. Make a small indent on top using your finger, a straw, or a skewer. Place this log on top of the red dough and carefully wrap it to mimic an apple’s roundness. Press gently to refine the shape, and reshape the indent if needed to emphasize the apple’s curvature.
Step 8: Add the Stem and Leaf
Next, arrange the green and brown dough logs on top of the indent to create the apple’s stem and leaf. Once everything looks perfect, return the dough log to the fridge for at least another hour to firm up again before slicing.
Step 9: Slice and Prepare to Bake
When well chilled and firm, slice your dough log into 1/4 to 1/2 inch thick cookies. Space the slices about 1 1/2 to 2 inches apart on lined baking sheets. Using a skewer, make a small indent on the bottom of each cookie as reference. Place two black sesame seeds in the center of each cookie, pressing them in lightly for that final touch of detail and flavor.
Step 10: Bake to Perfection
Bake your Apple Slice u0026amp; Bake Cookies in a 375°F oven for 10 to 12 minutes, or until the edges just begin to show a hint of golden brown. The goal here is soft, tender cookies, so remove them as soon as you see browning at the edges. Let the cookies rest on the baking sheet another 10 minutes to finish setting up before transferring them to a wire rack to cool completely.
Step 11: Enjoy!
That’s it! Now you get to dig in and savor the beauty and taste of your handiwork. These Apple Slice u0026amp; Bake Cookies are as fun to make as they are to share and enjoy.
How to Serve Apple Slice u0026amp; Bake Cookies
Garnishes
For an extra festive touch, sprinkle a tiny bit of cinnamon or nutmeg on the cookies right after baking to complement the apple motif. A dusting of powdered sugar can also add a charming “frosted” look that’s irresistible.
Side Dishes
Serve these cookies alongside a warm cup of spiced apple cider or your favorite tea to enhance the cozy, comforting vibe. They pair wonderfully with vanilla or caramel ice cream for a decadent dessert experience.
Creative Ways to Present
Arrange your Apple Slice u0026amp; Bake Cookies on a platter with fresh apple slices and a handful of autumn leaves or nuts to set a seasonal mood. Wrapping a few in clear cellophane with a colorful ribbon makes a perfect gift that looks as thoughtful as it tastes.
Make Ahead and Storage
Storing Leftovers
Keep your cookies fresh by storing them in an airtight container at room temperature for up to 5 days. This helps preserve their soft texture and lovely flavor without drying out.
Freezing
You can freeze the dough logs before slicing and baking—wrap them well in plastic wrap and then foil to prevent freezer burn. When you’re ready to bake, thaw in the fridge overnight, then slice and bake as usual for freshly baked cookies any day you want.
Reheating
If your cookies have cooled and lost a bit of their soft charm, warm them up in a preheated oven at 300°F for 3 to 5 minutes. This brings back that freshly baked warmth and softness as if they just came out of the oven.
FAQs
Can I use natural food coloring for these cookies?
Absolutely! Natural colorings like beet juice for red or spinach powder for green can work well, but keep in mind they may slightly affect the dough’s texture or flavor. Experiment with small batches to find your preferred balance.
What if I don’t have black sesame seeds? Can I substitute something else?
If you don’t have black sesame seeds on hand, tiny chocolate chips or poppy seeds can add a similar touch of texture and color, though the flavor note will be a bit different but still delicious.
Can I make these cookies gluten-free?
Yes, but you’ll want to swap the all-purpose flour for a gluten-free baking mix that includes xanthan gum or a similar binder. The texture may vary slightly, but the cookies will still taste fabulous.
How thin should I roll out the dough?
The red dough needs to be rolled very thin—about 1/8 of an inch—for the best wrapping and apple effect. The other doughs for stem and leaf should be thin but sturdy enough to hold their shape when sliced.
Can I make this recipe vegan?
To veganize, replace the butter with a plant-based alternative and swap the egg with a flax egg or another egg substitute. Vanilla extract works the same, and make sure your food coloring is vegan-friendly. The results will still be delightful!
Final Thoughts
These Apple Slice u0026amp; Bake Cookies bring such joy to the kitchen and the table. They’re a beautiful mix of creativity and classic cookie comfort all rolled into one. Whether you’re baking for a special occasion or just because, this recipe promises smiles with every bite. So grab your ingredients and get ready to create cookies that are as adorable as they are delicious—you won’t regret diving into this wonderfully fun baking adventure!
Print
Apple Slice u0026amp; Bake Cookies Recipe
- Total Time: 3 hours 30 minutes
- Yield: Approximately 24 cookies 1x
- Diet: Vegetarian
Description
These Apple Slice & Bake Cookies are charming, soft, and flavorful treats perfect for any occasion. Featuring a colorful blend of red, green, and brown dough to mimic an apple with a stem and leaf, these cookies are as fun to make as they are delicious to eat. The buttery, vanilla-infused dough is rolled and carefully shaped, then chilled and sliced for the perfect soft bite with a subtle crunch from black sesame seeds.
Ingredients
Dry Ingredients
- 2 1/2 cups all-purpose flour
- 1 tsp baking powder
- 1/4 tsp salt
Wet Ingredients
- 1 cup unsalted butter, softened
- 1 1/2 cups granulated sugar
- 1 egg
- 2 tsp vanilla extract
Coloring & Decoration
- 2 drops red food dye
- 1 drop green food dye
- 1 drop brown food dye
- 1/2 Tbsp black sesame seeds
Instructions
- Mix Dry Ingredients: In a medium-sized bowl, whisk together the all-purpose flour, baking powder, and salt until evenly combined. Set aside for later use.
- Cream Butter and Sugar: In a separate bowl or using a stand mixer with a paddle attachment, beat the softened butter and granulated sugar together on low speed for about 2 minutes until the mixture is light and fluffy.
- Add Egg and Vanilla: Add the egg and vanilla extract to the butter-sugar mixture. Continue mixing until fully incorporated and smooth, occasionally scraping down the sides to ensure even mixing.
- Combine Dry and Wet Ingredients: Gradually add the dry ingredient mixture into the wet ingredients, mixing until a soft dough forms. Avoid overmixing.
- Separate Dough for Coloring: Remove about 1/2 cup of the dough and set aside to dye red. From the remaining dough, take 1 tablespoon for green dye and another 1 tablespoon for brown dye. Keep the rest uncolored in the main bowl.
- Dye the Dough: Wearing gloves if possible, add drops of food gel to each small portion of dough (red, green, and brown) one drop at a time, kneading gently until the color is fully distributed and the dough reaches the desired shades.
- Roll Out Dough: Roll the red dough out to about 1/8 inch thick between two sheets of parchment paper to prevent sticking. Shape the green and brown dough into long thin logs. Roll the uncolored dough into a log approximately 1 1/2 inches in diameter. Place all dough in the refrigerator to chill for at least 2 hours.
- Shape the Apple: After chilling, remove the uncolored dough log. Make an indent on top using your finger, a sturdy straw, or skewer. Place this log onto the rolled red dough and carefully wrap the red dough around it to cover completely. Gently press to refine the apple shape and deepen the indent for authenticity.
- Create Stem and Leaf: Take the green and brown dough logs and position them on the indent area to mimic the apple’s stem and leaf. Return the combined dough log to the refrigerator and chill for at least 1 hour to firm up.
- Slice and Prepare for Baking: Slice the chilled log into 1/4 to 1/2 inch thick slices. Arrange the slices on prepared cookie sheets spaced about 1 1/2 to 2 inches apart. Use a skewer to make a small indent at the bottom of the apple shape, mirroring the top indent. Place two black sesame seeds into the center of each cookie, pressing slightly.
- Bake the Cookies: Bake at 375°F (190°C) for 10-12 minutes, or until the edges just begin to brown slightly. Baking until soft is key to the perfect texture.
- Cool: Carefully remove the cookies from the oven and let them sit on the baking sheet for an additional 10 minutes. This allows them to firm up and finish baking gently while cooling.
- Enjoy: Transfer cooled cookies to a wire rack if desired and serve. Enjoy your charming apple slice and bake cookies fresh or store in an airtight container for up to a week.
Notes
- Chilling the dough thoroughly is essential for easier handling and cleaner slicing of the cookies.
- Use gel food coloring for vibrant colors without altering the dough consistency.
- If you don’t have black sesame seeds, small edible black pearls or poppy seeds can be a creative substitute for the apple seeds.
- Cookies are best enjoyed within a few days but can be frozen for up to 1 month.
- Use parchment paper for rolling to prevent sticking and make clean, thin red dough sheets.
- Handle the dough gently to maintain the defined apple shape in the slices.
- Prep Time: 20 minutes
- Cook Time: 12 minutes
- Category: Dessert, Cookie
- Method: Baking, Rolling, Chilling
- Cuisine: American
Nutrition
- Serving Size: 1 cookie (about 30g)
- Calories: 150
- Sugar: 12g
- Sodium: 80mg
- Fat: 8g
- Saturated Fat: 5g
- Unsaturated Fat: 3g
- Trans Fat: 0g
- Carbohydrates: 18g
- Fiber: 1g
- Protein: 2g
- Cholesterol: 30mg
Keywords: apple cookies, slice and bake, homemade cookies, colorful cookies, soft cookies, apple shaped cookies
